
Software
-
New demo: moon shader
When I was thinking about how to put the moon into the 3D view of my astronomy app, I figured it would be a waste to actually display a textured sphere. After all, we always see the same side of the moon. All that is needed is a textured quad, and a shader which emulates a lit sphere. In the end, the quad was reduced to a single vertex –…
-
Animated IFS
This shows a combination of an IFS (iterated function system) and a particle system. In an IFS, points are attracted towards a fractal shape by iterating the positions over a set of affine transformations. The original algorithm starts with just one random point and plots its current position over a series of randomized transformations. In this example, I instead start out with a number of randomly distributed particles, which are…
-
Processing(JS)
Recently, I dusted off my copy of “The Computational Beauty of Nature” and started rediscovering this still wonderful book. The chapter about IFS fractals inspired me to do some experimenting with animated fractal shapes. An opportune moment to learn more about Processing! After playing with it for a few hours, I have to say, this is a wonderful programming environment for this kind of visual experiments. Virtually no boilerplate code,…
-
New demo
Added a new entry in the Demo section, showing how to do articulated figures in processing. Check it out: Articulated Structures Animation
-
-
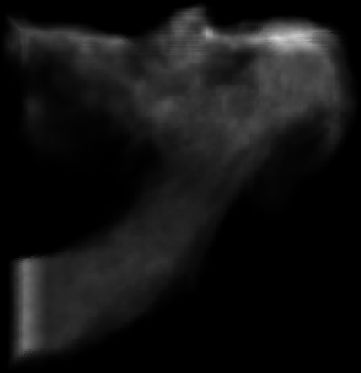
Volumes and surfaces
- Research prototype
- C++ / Qt / OpenGL / GLSL
- Volume visualization
- Geometry processing
-
Qt and OpenGL programming in Python
Qt is a well-established framework for developing GUI applications in C++, and it has good support for OpenGL. It is relatively cumbersome, though, to set up a project for just a simple, experimental application. Moreover, even though Qt and OpenGL are portable, carrying over your project from, say, your Linux box to a Windows PC is not completely seamless, due to different compiler configurations, etc. Being a Friend of Python,…
-
Ocean water simulation
At Scanline VFX, we were doing a whole lot of CG water for the movie “Megalodon – Hai-Alarm auf Mallorca”. I leave it to you to rate the movie, but, hey: the project got me a credit on The Internet Movie Database. My part in this was the R&D on ocean water surface simulation. I ended up doing a variation of the FFT-based approach put forth by Jerry Tessendorf, and combined…
-
Facial Animation and Modeling
Facial animation is, despite all advances on the technical front, still a challenge and a rewarding research subject. This might be the one-line summary of my PhD thesis, the outcome of my time at the Max-Planck-Institut für Informatik in Saarbrücken. In a few more words, I developed an anatomy-based modeling approach in conjunction with a physically-based animation system. The title of my thesis is “A Head Model with Anatomical Structure…